
Step 1: Identify the area that needs to be stained

You probably already have an idea of what work needs to be done, but be sure to go and thoroughly evaluate the area that needs to be stained.
Step 2: Check for absorption

To make sure your masonry will absorb water, and thus our stain, wet it with water. You can use a hose or a spray bottle, or just throw on some water from a cup! If the water beads up and rolls away, or if the masonry doesn't darken very much (or at all), then it can't be effectively stained by our process. The brick may be too hard and dense, or maybe it has a sealer on it. However, if the brick does darken, like pictured above, then our stain will work on your masonry.
Step 3: Buy a Proven Masonry Stain kit


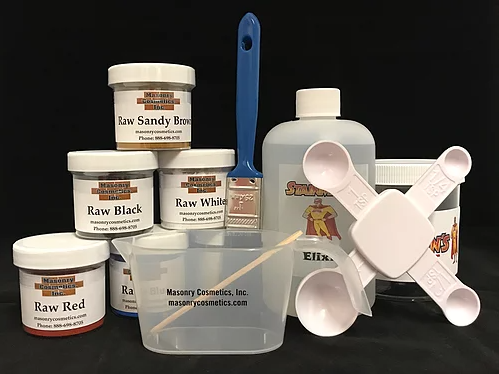

No matter the work that needs to be done, Masonry Cosmetics has a kit that can suit your color changing needs! All kits come with everything needed to stain, and more pigment or mixing solution can be ordered through our office.
The Colorant Kit:
This kit is designed for use by homeowners for one-time use on projects. The kit will cover from 150-200 sq. ft, depending on the recipe used. The Colorant Kit is perfect for fireplace makeovers and smaller repair jobs on mismatched brick or brick repairs.
The Brickman Stain Kit:
The Brickman Stain Kit is designed for large projects and multiple uses, and will cover 300-400 sq. ft. depending on the recipe used. It's perfect for home makeovers or for use by contractors for use multiple times on jobs sites in order to quickly take care of punch list items.
The Limepop/Chip Kit:
This kit is designed to help home and business owners make quick repairs to some of the unsightly and unfortunate things that can happen to bricks naturally, such as lime pops and brick chips. Limepops, pyrite pops, chips and others, while harmless to your wall, can be unsightly. Using our limepop/chip kit, these aesthetic problems can be easily fixed!
The Restore Paver Color System:
Specially engineered for use on horizontally laid masonry, this kit can be used to restore or change the color of concrete pavers that can last year after year. With over 30 colors to choose from, we have a wide variety of color choices to choose from to rejuvenate your faded concrete pavers!
All kits are available to purchase on our store here.
The Colorant Kit, the Brickman Stain Kit, and select colors of the Restore Paver Color system are available to purchase on Amazon! Just click the image below to be taken to our Amazon store page.
Step 4: Choose a test area

Coming up with the right color for your project is a process of trial and error. Because of that, we highly advise that you create a test area in order to test out both recipes for your color(s), as well as get a taste for what the end result will be.
Above, you see a picture of one of our professional staining team's test areas, done prominently to show the homeowner what the color match looked like. However, we recommend that you do your testing in a more innocuous area, in case the mix isn't right yet. If possible, we advise that you do it off the wall completely, if you have spare pieces of masonry you can test colors on.
Step 5: Develop a recipe

After purchasing the kit needed for your project, with the exception of the Restore Paver Color System, a recipe for your stain must be created. If you need assistance with creating a recipe for your project, especially if multiple colors are needed, contact us via info@masonrycosmetics.com and one of our color specialists can assist you in creating a recipe.
When creating a recipe, here are some helpful tidbits to keep in mind!
-
Choose colors that, when combined with the color of the brick itself, will make the new color you desire. Our stian is translucent, so the background affects the final color. Remember color theory: red + yellow = orange,
black + white = grey, etc.
-
When creating a recipe, be sure to take notes on your measurements so it can be easily and accurately recreated.
-
Always use level measurements: Our pigments are strong! Even a little extra can change the color noticeable.
-
Start small, then go big. You can always add more, but you can't take it out after it's been added.
-
For a slight color change, start with 1/2 to 1 teaspoons of pigment.
-
For a major color change, start with 2 to 3 teaspoons of pigment.
-
To lighten or darken a mix, add white or black in 1/4 teaspoons increments.
-
Allow the test area to dry for at least 30 minutes before deciding if adjustments to your recipe are needed.
Step 6: Staining your brick
For a tutorial on good staining technique, watch the above video. We advise you practice staining with water before doing the real thing!
Here are some extra staining tips to help you accomplish your project better:
-
Make sure to drain your brush well! Very little stain is required in order to make a significant color change: don't slap it on like paint!
-
Stain the whole brick in one smooth stroke to avoid creating lines from doing multiple overlapping brush strokes. The side of the brush can be used to touch up parts that you miss with the single stroke.
-
You can stain 3 to 4 bricks before having to re-dip your brush. Redipping too often, as well as not draining well enough, are the leading causes of the product being put on to heavily. When it's put on too heavily, the pigment can sit on top of the brick, then under wet conditions can cause the pigment to run.
-
Keep a wet cloth nearby in case you accidentally stain something you don't want to or drip the stain onto something: quickly dab the surface with the wet cloth.
The Ins and Outs of Brick Staining
Brick staining or brick recoloring is a process in which a compound is bonded to a brick, stone, or block wall or surface. The compound is a mixture of our unique chemical treatment and a blend of our dyes. Ultimately, the goal of this treatment is to bring forth the natural beauty of the brick and restore the original color, or to add some new color to really make the structure stand out. This treatment works on many types of mason surfaces and looks fantastic on stone, blocks, and mortar.
Of all the masonry staining kits available on the market today, ours has proven successful through our patented formula and beautiful range of color options. Our colors work with every brick color out there and our kits can cover up to 400 square feet. Our kits are also perfect if you want to stain the mortar in between your bricks to create a stark contrast in your wall.
These brick recoloring dyes and treatments produce drastically different results from what you’d get if you painted your brick or stone surface. While brick, stone, and mortar are tough, it’s important to treat them with care, as poor treatment can cause irreversible damage. A poorly done treatment can make your surface look awkward and unappealing.
Our masonry staining kits can transform the walls of your home or office into a beautiful sight to behold. You’ll find that this invites others to appreciate your structure. This can be very beneficial if you’re a business owner, since nothing says classy quite like fresh, handsome brick. Our masonry staining kits are also just the thing for restoration projects. If you want to see a historic building look like new, our staining kits have you covered. When you admire your handiwork, you’ll feel like you’ve stepped back in time.